How to Create a Website and a PDF from the Same Codebase
TL;DR: Let's build a website and generate a PDF from the contents using basic CSS and a PDF generation API.
Recently a client approached us to produce a digital version of a printed information packet. Making changes to this packet was costly and time-consuming, so they wanted to convert the sections of the packet into pages on a website, with a CMS to make updates easier. The client also wanted to retain the ability to print the whole thing, with the same design quality as the existing packet. We were able to get a lot done using CSS print styles, but because browsers don’t support the full suite of CSS print styles, it was clear we’d ultimately need to generate a PDF to get the print design we desired.
This started a journey into the world of HTML-to-PDF services, and I’m quite pleased with the solution we landed on. I’ve since started using it in another project, and I wanted to share it with you today. In a nutshell, we’re generating a website from a CMS using Eleventy and generating a PDF version of the website using DocRaptor.
To make this project easier to talk about without all the client-specific details, I’ve created an example repo. It takes a public-domain Sherlock Holmes story and generates both a website and a PDF.
The PDF Service
To generate the PDF, we’re using an HTML-to-PDF API service called DocRaptor. I found it to be easy to use and I’m happy to recommend it, but there are alternatives out there, including Adobe PDF Services, WeasyPrint, and even the tool that DocRaptor is built on, PrinceXML. They all do roughly the same things, and it would be easy to swap out DocRaptor for another service.
The main thing you need to understand is that we’re going to make an API call to a PDF generation service, and the body of our request will be the HTML it will use to generate the PDF. That HTML needs to include not only all the contents of the PDF but also all the images and styles.
Let’s break this down into three parts: How we generate the HTML for the PDF, the JavaScript we use to generate the PDF, and the CSS we use to style both.
The HTML
The example repo uses Eleventy to generate the website. I like Eleventy a lot, and I think it’s a good fit for this kind of static site, but you could easily replace it with any build tool you wanted, including none at all. This process would work just as well with a hand-written HTML file. The only thing that matters is that we have a single HTML file that contains all the content we want to end up in our PDF.
Our goal was to have both a website and a PDF. In the example repo, the website is a public domain Sherlock Holmes story, broken up with each chapter on its own page to make reading easier. But to generate the PDF, we need a single HTML file with all the content.
Eleventy makes it easy to do this with a single file:
{% include 'title-page.njk' %}
{% include 'frontispiece.njk' %}
{% include 'contents.njk' %}
{% for chapterObject in collections.chapters %}
  <article class="new-page">
    {% include 'chapter-header.njk' %}
    {{ chapterObject.content | safe }}
  </article>
{% endfor %}
We’re manually including a few PDF-specific pages, such as the title page and table of contents. Then we loop over all the book content, which is in an Eleventy collection called “chapters.” We write out the contents of each chapter on the page wrapped in an <article> element. Here’s what this all-in-one page looks like on the website, though it’s worth noting that no one will be looking at this page, it’s just being generated so we can pass it to the PDF generation service.
The CSS
One of the best parts of this process is that once you write the CSS for the website, you’re 90% done with the CSS for the PDF as well. DocRaptor is powered by PrinceXML under the hood, which has very good CSS support. And, since all of the DocRaptor CSS is based on real-world specs for CSS print styles, almost everything you write for the PDF has the bonus of giving your website good print styles.1
I found that I was able to use all the CSS I wrote for the website and I only needed to add a single print stylesheet that contained some additional rules for DocRaptor such as page margins, hiding some web-only content, and adding page numbers.
The only “bugs” I needed to fix in my existing CSS were related to modern syntax that DocRaptor doesn’t understand just yet, like logical properties (I had to replace a few instances of margin-inline with margin-left and margin-right). Another common change was adding page-break-inside: avoid to keep images from breaking across pages, for example.
When testing CSS changes, I found that the browser’s print preview was often good enough, if I didn’t want to wait for another API call to generate an updated PDF. Another option in Chrome is to emulate print media, which will apply the print styles in the browser window. When testing the print layout in the browser, I found that the printed page was 816 pixels wide (8.5 inches at 96 pixels per inch), which means my content column, after subtracting the 0.75 inches of margins, was 672 pixels wide.
You can view the full CSS for the example site, but I’d like to talk about a few specific features.
Page Margins
You can easily adjust the page margins in the PDF:
@page {
  margin: 0.75in;
}
That’s actually standard CSS. You can read more details on MDN.
If you want to override the margins on a particular page you assign it a name, and update the rules for that page.
.full-bleed-page {
  page: full_bleed_page;
}

@page full_bleed_page {
  margin: 0;
}
Page Header
Like a printed book, I wanted to put the name of the story in the header for each page. This turns out to be easy, again using standard CSS:
@page {
  @top {
    content: 'A Study in Scarlet';
    font-family: Merriweather, serif;
    margin-top: 1em;
  }
}
The @top at-rule targets a section of the page appearing in the page margin itself. In our case, we’ve targeted the top section, added content, styled it, and given it a bit of margin from the top of the page. By default, the content will be centered.
Note that if you’re not careful, this content could overlap your page content.
Page Numbers
Adding page numbers is a similar operation:
@page {
  @bottom {
    content: counter(page);
    font-family: Merriweather, serif;
    margin-top: 1em;
  }
}
We’re adding content to the @bottom section, but rather than giving it a simple string of text, we’re saying it should use the value of the page counter, which DocRaptor defines for us.
Table of Contents
Now the table of contents takes a little more work. In our HTML, we have a simple ordered list with jump links to the appropriate sections of the document, like so:
<ol type="I">
<li>
<span class="toc-item">
<span class="toc-item__title">
<a href="#ch-I-mr-sherlock-holmes">Mr. Sherlock Holmes</a>
</span>
<span class="toc-item__page print-only">
<a href="#ch-I-mr-sherlock-holmes"></a>
</span>
</span>
</li>
...
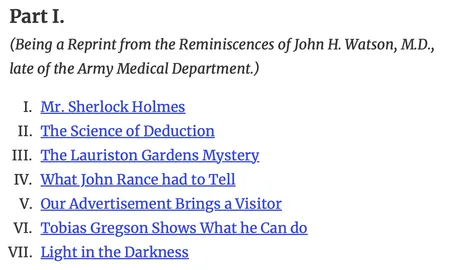
</ol>Note the .print-only class, which as you might guess hides that element from view in the browser. Also note the empty anchor tag it contains, which we will populate with a page number using CSS.
When this block of code is shown in the browser, we get a simple unordered list of chapter titles that are jump links to further down the document, with no page numbers.
Now, we add this CSS for the print styles:
.toc-item {
  display: flex;
}

.toc-item__title {
  flex: 1;
}

.toc-item__title::after {
  content: leader(dotted); /* add dot leaders */
}

.toc-item__page a::after {
  content: target-counter(attr(href), page); /* add page numbers */
}
We make each table of contents item into a flex layout and assign all the space to the title.
We add dot leaders using generated content after the title using the proposed leader() syntax (which at the moment, I believe is only supported by PrinceXML!)
We insert the page number for the chapter using a clever bit of syntax that lets DocRaptor look up the page number that will contain the ID the jump link is targeting.
And then we get dot leaders and page numbers automatically added via CSS!

- DocRaptor docs: Page Numbers
- DocRaptor docs: Table of Contents
The JavaScript
Now, let’s talk about the Node script we use to submit the HTML to the PDF generation service. You can view the full script on GitHub, but I’ll walk you through the structure of what we’re doing here.
await generatePDF('dist/a-study-in-scarlet/index.html');The first thing that happens is we call the generatePDF() function and pass it the path to our HTML file.
generatePDF()
The generatePDF function is our one-stop shop for generating a PDF from an HTML file, but it farms out the work to several smaller functions for ease of maintenance.
const generatePDF = async (htmlPath) => {
  // Get the slug and path info for this HTML file
  const meta = getMeta(htmlPath);
  // Get the contents of the HTML file
  const html = await getHtmlFromFile(meta.htmlPathCWD);
  // Create a PDF from the HTML contents
  const pdf = await fetchPDF(html, meta.slug);
  // Create the output directory if it doesn't exist
  await fs.mkdir(distDir, { recursive: true });
  // Save the PDF to a file
  await fs.writeFile(meta.pdfPath, pdf);
  console.log(`[PDF] Writing ${meta.pdfPath}`);
};
First, it calls getMeta(), which returns information including the file slug and the full path info. Then it passes the HTML file path to getHtmlFromFile(), which reads the actual markup from the file and makes some changes we need for DocRaptor, like inlining the CSS and images. Then it takes the markup and passes it to fetchPDF(), which handles the actual API call to DocRaptor and returns PDF data. Finally, it writes the PDF data to a file.
Let’s take a look at those functions in more detail.
getMeta()
Up first, we have getMeta(), which accepts a path to an HTML file and returns information about that file.
const getMeta = (htmlPath) => {
  // Strip `dist/` and `/index.html` from htmlPath
  let slug = htmlPath.slice(5, -11);
  // Special case for the root HTML file
  if (htmlPath === 'dist/index.html') slug = 'home';
  // Create relative HTML path and PDF write destination
  const htmlPathCWD = path.join(currentDir, htmlPath);
  // Convert any slashes to dashes for the PDF filename
  const pdfSlug = slug.replace('/', '-');
  // Create the PDF write destination
  const pdfPath = path.join(distDir, `${pdfSlug}.pdf`);
  return {
    slug,
    htmlPathCWD,
    pdfSlug,
    pdfPath,
  };
};
We get back four pieces of information, which are all used later:
slug, which is the filename, is only used for error logging if something goes wrong.htmlPathCWDis the full path to the HTML file including the current working directory. We need this to read the contents of the file in the next function.pdfSlugis used for the filename of the PDF, and we’re just replacing any slashes with dashes.pdfPathis the final output directory of the PDF, which is ourdistfolder plus the PDF filename.
getHtmlFromFile()
Next, we have getHtmlFromFile() which is responsible not only for getting the actual contents of the HTML file but also for making changes we need for PDF generation.
const inlineAssets = unified()
  .use(rehypeParse, { fragment: false })
  .use(rehypeInline)
  .use(rehypeStringify);

const getHtmlFromFile = async (htmlPath) => {
  // Grab the HTML file contents as a string
  const rawHTML = await fs.readFile(htmlPath, 'utf8');
  // Change the CSS URI to a path so it can be inlined
  let updatedHTML = rawHTML.replace('/style.css', 'dist/style.css');
  // Change any image URLs to paths so they can be inlined
  updatedHTML = updatedHTML.replaceAll('/images/', 'dist/images/');
  // Inline the assets
  return String(await inlineAssets.process(updatedHTML));
};
Once it loads the HTML contents, it modifies any CSS and image URLs to file paths so they can be inlined. We inline the CSS and images because the only thing we pass to DocRaptor is the HTML itself. DocRaptor can load assets from public URLs, but during development work, none of our files were public, so we got in the habit of inlining them.
For inlining, we’re using a library called rehype-Inline, which is capable of inlining CSS, JavaScript, and images in HTML documents.
fetchPDF()
Finally, we come to the meat of the process: Passing the HTML to DocRaptor, which will return a PDF.
const fetchPDF = async (html, slug) => {
  if (!docraptorApiKey) throw new Error('Missing DocRaptor API Key');
  // Send HTML to DocRaptor to generate PDF
  const pdfRes = await fetch('https://docraptor.com/docs', {
    method: 'POST',
    headers: {
      Authorization: `Basic ${Buffer.from(docraptorApiKey).toString('base64')}`,
      'Content-Type': 'application/json',
    },
    body: JSON.stringify({
      test: docraptorTest,
      document_content: html,
      type: 'pdf',
      prince_options: {
        profile: 'PDF/UA-1', // Adds accessibility features like tagging
      },
    }),
  });
  if (!pdfRes.ok)
    throw new Error(
      `${slug}: ${pdfRes.status} ${pdfRes.statusText} ${await pdfRes.text()}`,
    );
  // Extract the PDF from the response and return it
  const blob = await pdfRes.blob();
  return Buffer.from(await blob.arrayBuffer(), 'binary');
};
This is a simple fetch request to the DocRaptor API. You’ll need to define a DocRaptor API key and tell it whether or not to use “test” mode, which is free, but adds an overlay. The one extra option we’re defining is asking DocRaptor to use the PDF/UA-1 profile, which adds accessibility features.
This function returns the raw PDF data, which we then save to the file system, and hey presto! We have a PDF!
Conclusion
I’m quite pleased with this process because each step adds to the previous ones without getting tangled up. The website doesn’t know anything about the PDF. It’s just a straightforward Eleventy site that happens to include a single-page version of the website’s contents. That website includes print styles, including a handful of rules that only work in DocRaptor, but are all based on standard or proposed CSS syntax. The PDF generation itself happens entirely in a Node script that can be updated, modified, or even replaced in the future without breaking the website.
I know this probably isn’t a common problem, but I hope this article helps someone else who might be looking at a similar request and isn’t sure how to get started.
Footnotes
It’s worth noting that while the DocRaptor CSS is based on a real spec, a lot of the print-specific CSS is unsupported in most browsers. CSS Paged Media is unsupported in Safari, and has limited support in Firefox. The dot-leader styles we use for the table of contents is unsupported in any browser other than PrinceXML. As a result, while you’ll get good print styles in most browsers, they certainly won’t match the quality of the PDF. If more browsers supported these standards, it’s possible we could have delivered this project without needing to generate a PDF at all. ↩︎